Rebuild fuel pump harness with Ethanol resistant epoxy
I've benefited from many posts on this site and I hope the following might help someone. There's already an excellent post by monster.orgy which helped solve my fuel pump electrical problem. My post is intended to build on that mainly in regards to epoxy material selection.
I bought the bike new (2005 Monster S2R 800) and had no issues. As a testament to battery tenders I didn't need a new battery until 2013. When I bought a new battery, the gas tank had expanded and it wasn't possible to unlatch and swing the tank up to reach the battery. Instead the tank had to be removed by unbolting at the rear hinge. A longer fuel tank hinge support kit was installed by the dealer under special warranty covering the plastic fuel tank expansion defect.
To the point of this post: End of last summer the engine wouldn't start or would die off soon after starting. Then it completely stopped starting even though it cranked powerfully. After reading all the forums I followed this troubleshooting and repair sequence.
1. Does the fuel pump whir audibly when electricity is switched on? I couldn't be sure as I heard some sound. (In retrospect after the repair I know the complete sound wasn't there and what I was hearing could be an intermittent fuel pump.)
2. Does the engine work when engine starter fluid is sprayed directly into the air intakes? Yes it did. This lead me to believe it was a fuel delivery issue.
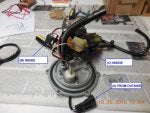
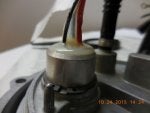
3. Is electricity reaching the fuel pump as measured outside the tank? Yes. The socket delivering electricity to the fuel pump isn't easy to probe but you can get creative with some wire and a small voltmeter. This meant it was time to take a look at the fuel pump assembly.
4. Empty the tank. I used a piece of clear vinyl tubing to siphon the tank first in the horizontal position and later while holding tank upright to get almost all the fuel out. The clear vinyl tubing was very helpful as I could see the fuel start flowing before accidentally swallowing any!
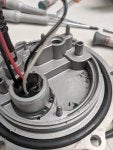
5. Remove the pump by unbolting the 6 allen screws. This is when I started taking photos of every step so I would know how to put it back together later. I also emptied a bit more remaining fuel and cleaned out some small particles from the tank.
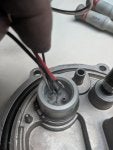
6. Check the resistance of each wire from outside the tank to corresponding color on inside. These go from connector A on outside to either B or C as shown in photo below. The photo shows everything disassembled prior to starting reassembly. I also removed fuel filter to change while at it.
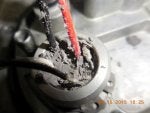
7. I discovered one black ground wire was intermittent when gently tugged. The epoxy was rotten and crumbling easily when scraped with a screw driver and the black wire came loose almost immediately.
The other wires seemed OK but they also came off easily after scraping away all the epoxy. So not only the epoxy was rotten but the solder (unless it was not soldered to begin with) was gone too. It seems to me unlikely that an electrical connection wasn't at least crimped. In either case I decided to solder all 4 joints and then encase the whole thing in Ethanol resistant epoxy.
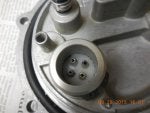
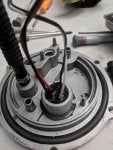
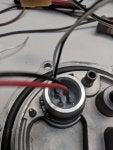
8. I cleaned using a cotton stick and acetone nail polish remover until satisfied it was ready for soldering.
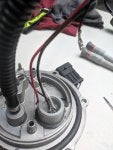
9. Soldering was quite tricky and I would advise against doing this unless you've done a fair amount of soldering before. Don't forget to clean up excess flux as it is corrosive and to measure the resistance after the soldering is done and before sealing it all up. I accidentally melted through the red live wire and this sent me off to thinking how to reinsulate it to avoid risk of sparking inside the tank! Fortunately the epoxy I would use to fill and encase the joints would also serve as insulation if applied around the wire.
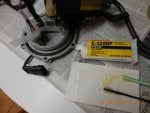
10. I don't know how long a regular two part epoxy would last however given the effort of rebuilding the wiring joints I invested some time researching something that hopefully will resist fuel with Ethanol for a while longer. Here I list the 3 that I found.
(I) LOCTITE E-120HP HYSOL EPOXY ADHESIVE. This is what I ended up using. It's very chemical fuel and ethanol resistant. Apparently it's export restricted because of its aerospace uses, so should be well enough for the sorts of speeds of a Ducati! It's not the most readily available but is available in the 50ml small quantity cartridge for $12 online. You'll end up using only a fifth of it. Ideally you need to also have an applicator gun and mixing nozzle but I just hand mixed it. It's quite fluid so is very easy to pour into the joint space. After mixing sufficient quantity on a cardboard surface I used a drinking straw to suck up and then squeeze it into the joint space. Once it was a little less runny I also covered the electrical wires with it, hopefully insulating my frayed wire.
(II) PERMATEX 84334 ETHANOL RESISTANT FUEL TANK REPAIR SEALANT ADHESIVE. This is readily available at Autozone etc. However it is the consistency of hard putty and needs to be kneaded and warmed to better work with. I think it would have required care to apply in a way to ensure the soldered joints were sealed well.
(III) PERMATEX® MOTOSEAL® 1 ULTIMATE GASKET MAKER GREY. The technical data sheet says “The product retains effective properties in contact with automotive fluids, such as motor oil, gasoline, transmission fluids, alcohol and antifreeze solutions”. It might be easier to work with than the fuel tank repair putty.
11. Putting it all back together was quick. One broken steel clip needed fixing, so be careful when removing them. Also, I had ordered two of the special steel hose clamps with the new fuel filter but couldn't make them work as they do require a special tool to crimp properly, so I ended up using stainless steel hose clamps of smallest size from Home Depot. (This is where if you have issues I would recommend reading Zen and the Art of Motorcycle Maintenance.) I used grease on the O-ring instead of a new one and so far it seems fine and not leaking.
The engine didn't fire up on first try which gave me that sinking feeling but worked like a charm once the fuel pump had primed sufficiently. The sound of the pump is loud and clear every time I switch on the electricity. So far it's looking good. Thanks again to the others who preceded me on this fix. If anything more develops I 'll post it here. Peace.