How to fix intermittent fuel pump issues due to failed wiring.
I referenced this site for ideas when I was having trouble with my fuel pump, so I thought I'd post a walkthrough.
I bought the bike used (2006 Monster S2R 1000) and rode for about 8 months without issues. Then, started having intermittent fuel pump outages. I first checked all the exposed wiring for either an open connection or a short. Eventually ended up digging through forums, eliminating the easy-to-check suggestions, and finally decided to pull the pump. Below is a walkthrough of my repair. With exception to the 6 hour cure time for the epoxy, the work itself shouldn't be more than a couple hours.
START
1. Disconnect power to the fuel pump by unplugging the 4 prong plug.
2. Drain the tank. I used the $3 hand pump siphon from the auto store. Pumped it down as low as I reasonably could. Saved the gas, of course.
3. Once the fuel level is low enough, tilt the tank on it's side to keep remaining fuel away from fuel pump flange.
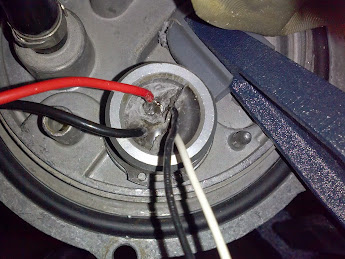
4. Remove the pump. Pull the 6 screws to remove the fuel pump. Once the pump was removed, I went ahead and pumped the remaining gas out of the tank to avoid breathing it in as it evaporated. This was the first time I had pulled the fuel pump on this bike. If you haven't seen it before, here's a picture.
5. Once the pump is pulled, check the resistance of the red wire across the epoxy joint. I connected the terminals to the red connection outside the tank and probed the red connector on the inside of the tank. The resistance on the ohm-meter indicated low resistance (~ 3 ohms), as it should; however, when I tugged or twisted on the red wire from the inside of the tank, the resistance spiked to several hundred times, indicating the wire was making poor contact somewhere in the epoxy joint. If the resistance reads abnormally high while messing with the red wire, you likely have the same issue.
6. After confirming you have a connection problem, you'll need to remove the plastic fuel pump fairing pieces (the fuel level sensor and a larger black fairing piece) to access the epoxy joint. There are several little steel clips holding the parts together. I carefully slid the clips off with a small screw driver so I could reuse them. I bent a couple during removal, but just smacked them flat again with a hammer.
7. Once you have access to the epoxy joint, dig through the epoxy for the wire union. I used a small screw driver to dig the epoxy away from the red wire, while being careful not to interfere with the other three wires. Down about 1/2", at the end of the red wire, I ran into a poorly soldered joint. The wire was easily pulled out of the joint. Below is an image of the small hole in the union along side the red wire with the poorly laid solder still on it. I fortunately didn't have to dig all the way through the epoxy. That way, even if my epoxy patch job were inadequate, I still have the original seal to prevent any new fuel leaks.
8. With the soldering iron, I first burned off the old solder at the end of the red wire. Then, stuck the red wire back into the port and resoldered the joint. As you can see from the image, I soldered the hell out of it. I left a blob of solder large enough for the epoxy to hold onto it and keep the joint from wiggling loose. Maybe overkill.
9. After soldering your joint, be sure to check the resistance of the red wire across the epoxy joint again and tug lightly on the wire to ensure you have a good weld.
10. Prepare the area for new epoxy. I blew out the area and zip tied the wires together to hold them in position while the epoxy sets. After a little research, I confirmed that both JB Weld and JB Kwik are gas and oil resistant after curing; however, they both prefer a dry, non-oily surface until cured. I didn't need the high strength and temperature tolerance of original JB Weld, so I used JB Kwik. After filling in the hole, I poked at it with a tooth pick to work the JB into the cracks. Then, let it sit for the full 6 hour cure time.
![Image]()
11. Once cured, put the fuel pump back together. I used a little grease on the o-ring for the fuel level sensor to help slide it back into place. To push the clips back onto the posts, I used a small socket to push them down evenly (maybe 10mm for the big ones and 6 for the small ones ?) Don't forget to reconnect all the plugs and any stray ground wires (one ground goes to the fuel filter, the other to the fuel level sensor). NOTE: this isn't a bad time to replace the fuel filter, if you're due.
12. Reinstall the fuel pump assembly in the tank and tighten the 6 bolts incrementally to ensure the flange seats properly. Be sure to put fuel back in the tank before you turn the key. You don't want to run the pump dry.
END
It'll probably take a few more successful rides before I fully trust the bike again, but so far, I haven't had any issues.


")